Content: Overview · Features & usage · Two typesetting modes · Normal Mode · Product Mode · Activating/deactivating Product Mode · Hard-locking on a product file · User interface · Options screen (Settings) · Modifier keys · Tools · Notifications · Installation and setup · Basic installation · Launching the script with a hotkey · Using the modifier keys · First run · System requirements / other requirements ·
Overview
Main purpose of the script is to launch the typesetting command on a ConTeXt document. The behavior of the script is customizable and it can be adapted to many different use-cases.
You can apply the script either on a selected tex file in the Finder, or on a tex file currently open in the editor. It works with most editors, for example BBEdit, MacVim, TextMate, etc.
In addition the script provides easy access to some ConTeXt related tools.
Please note that the script assumes that you are working with ConTeXt “Minimals” (the standalone installation; ideally consisting of a ConTeXt Beta and a ConTeXt Current). It sets the paths via the setuptex file found in ‘tex/’ inside the Minimal. If you use a TeXLive installation the script will most certainly not work without modifications.[1]
Features & usage
Two typesetting modes
Normal Mode
This is the main and default mode. The script behaves adaptively:
Launch the script with an open ConTeXt document in your text editor to typeset the document, or …
Select a ConTeXt document in the Finder and launch the script on it.
While searching for an open ConTeXt document in your text editor the script will assume that the editor is the frontmost application. If it doesn’t find a suitable document it will fall back and test the current Finder selection.[2]
Product Mode
If you never work with product and component files you can skip this section.
The ConTeXt structure for more complex documents is one project file, one or more product files and several component files that belong to a product file. The product file usually represents the book and the component files the chapters (or sections). Normally you work on the component files and want to typeset the product file to review your changes.
Product mode basically allows you to typeset a project’s product file without activating it’s window, even without loading it into the text editor at all.
This way you can continue editing your component file without window switching while the script typesets the product file in the background.
Activating/deactivating Product Mode
You can activate/deactivate Product Mode either through the Options screen (permanently) or through the ‘option’ modifier key (temporarly).
You have to show the script once where the product file lives. You do this simply by selecting the product file in the Finder and running the script once on it. The script is now “soft-locked” on the product file.
Now, back in the editor with the open component files, if you launch the script in Product Mode it will always typeset the product file, no matter which file is currently active in the text editor. That is, for typesetting you don’t have to switch anymore between component and product file window in your text editor.
After the first typesetting run with the Finder-selected product file, the script will remember the target file, even if it gets unselected, or another non-TeX file is selected. This way you can work in the finder while typesetting, or between typesetting sessions, without the script losing focus on the product file (unless there is another TeX file selected at script launch).
Hard-locking on a product file
If you find yourself “losing” the product file often, e.g. if you work with other, unrelated TeX files inbetween, or if you work on the same product for a longer time you have the option to hard-register a specific product file.
Registering means that the script will never lose focus on the product file, unless you unregister it or you register explicitely a new product file.
You can register a product file via the Options screen or via the ctrl-opt modifier keys. You can unregister a product file via the Options screen. For registering/unregistering the target file must either be frontmost in your text editor or selected in the Finder.
Of course, if you want to typeset a component file without the product file, you can do so at any moment by stepping out of Product Mode (modifier key or Options screen). The script will not forget the product file and will be back on it when you reactivate Product Mode.
If you are in Product Mode but don’t have any product file registered you are automatically in “soft-locking” Product Mode as described above.
Of course Product Mode also works with other file structures that are loaded
in the main file via \include or similar macros.
User interface
The GUI comprises the Options screen and a Tools screen which is accessible from the Options screen.
Options screen (Settings)
You can access the Options screen by holding down the ctrl key at script launch.
You activate an option or launch a command by selecting the entry with the mouse. Use the cmd key to select/unselect multiple entries. Whenver it makes sense, an option is sticky. That means the setting (and also the visual selection in the Options screen) will be remembered until you deselect it or recompile the script.
Symbols
The entries in the options window are pragmatically classified through their symbols:
- ▷ or ◻︎
- A white symbol indicates a setting. Nothing will “happen” when you click OK, the new setting will be used from the next typesetting run on. (When you launch the script again.)
- ▶ or ◼︎
- A black symbol indicates a command that will be executed immediately after closing the options window with OK. For example ▶ Un-Register Product File will do so immediately after you hit the OK button.
- ▷ or ▶
- A triangle indicates a setting/command that will affect the future behavior of the script or the typesetting result in any way. For example if you select ▷ LuaJitTeX the script will use LuaJitTeX in future typesetting runs, until the entry is deselected.
- ◻︎ or ◼
- A square indicates a simple command that has nothing to do with the behavior of the script and will not change the outcome of future typesettings. For example ◼ Purge all will just execute the purge command when you hit OK.
- ▶▶ or ◼◼
- A doubled symbol means that the command needs a target. Make sure that the right file is either selected in the Finder or opened in the text editor before you launch the command. For example ▶▶ Register as New Product File works only while the desired file is Finder-selected or opened in the frontmost window of the text editor.
- →
- An arrow indicates that the entry will just open a submenu in another window. For example Tools → will open the Tools menu when you select it and click OK. This will also work while other options are selected. So if you want to open Tools without losing your other selections click on ‘Tools’ with the cmd key down, then hit OK.
- Indentation
- Indentation indicates dependency. If you select an indented option or command it will be without consequences unless the parent option is activated. For example you can register a new product file at any time, but it will not be used if you are not in Product Mode. Or, if you set another PDF viewer you won’t notice any difference if Do not Launch PDF Viewer is selected (or activated via modifier key).
The settings

- ConTeXt Beta / ConTeXt Current
- Switches between your ConTeXt Beta and ConTeXt Current installation for typesetting. Of course, “Beta” and “Current” may be treated as placeholders[3]: You can set an older beta which works well for you as “Current” and the latest cutting-edge beta as “Beta”. To reassign your ConTeXt installations to the slots choose Tools → Reassign ConTeXt installations.
- LuaJitTeX / LuaTeX
- Use LuaJitTex instead of LuaTeX.
- Typesetting mode
- Normal Mode / Product Mode, see above. This can be toggled on the fly with a modifier key (see below).
- Register as New Product File
- Hard-locks on the active or selected file. Can also be done via modifier key (see below.)
- Unregister Product File
- Forgets the registered product file. Normally not needed, because to ignore the product file it is sufficient to switch to Normal Mode. Can be useful if you alternate between two product files, one hard-locked, the other soft-locked. If applicable the currently registered product file is shown.
- Re-register Previous Product File
- Another way to alternate between products. If applicable the previously registered product file is shown.
- Run Mode
-
Switches between typesetting in the standard shell (hidden) or in the Terminal. If you use the standard shell the error log will automatically be opened when an error occurs. Typesetting in the hidden shell is unobstrusive, while the Terminal might be preferable for larger documents as it gives you some progress information. However even in shell mode you will be notified on completion. Run mode can be toggled on the fly with a modifier key (see below).
Note: For Terminal mode you have set the Terminal to use bash (default on OS X). Setuptex doesn’t seem to work with zsh. (The Terminal setting does not affect the standard “hidden” typesetting mode.)
- New Terminal Window
- Choose if you want to re-use an open terminal window for the next typesetting run or rather spawn a new window for each run.
- PDF Viewer Auto-launch
- Switches auto-launch off. Some PDF viewers are capable of auto-updating (Skim, Preview), so it is sufficient to auto-launch the viewer at the first run and then you can switch off auto-launch to prevent the viewer from pushing the editor to the background. This can be toggled on the fly with a modifier key (see below).
- PDF Viewer
- Choose the PDF viewer to launch if auto-launch is enabled. If you select Skim as viewer you should deselect Check file for changes in Skim’s preferences because the script already sends a revert command to Skim. (Only applies if you are working with the “hidden” shell (not terminal); see Run mode above.)
- Enforce synctex
- This adds the
--synctex=zippedswitch to the typesetting command. That is, it enforces SyncTeX regardless of the presence of the\enabledirectives [system.synctex]modline in your documents. It also works in cases where the modline sometimes doesn’t work, for example in self-contained, single-file tex documents (i.e. documents that don’t call external component or other input files). - Terminal Behavior
- If the terminal should stay in the background or come to the foreground. This applies to all Terminal windows: for typesetting runs, if you have selected the option above, and also for all tools that run in the Terminal, for example file purging or updating ConTeXt).
- Log Viewer
- Choose if the error log should be auto-opened in your current text editor or in the Console application. (Only applies in standard shell mode; log will only be opened in case of a typesetting error.)[4]
- Automatic Syntax Checking
-
Turn on or off automatic syntax checking with mtx-check. If on mtx-check will be launched after a typesetting error has occurred. The output will be appended to the log file which will open automatically after an error. (Only applies in standard shell mode.) Can also be launched manually (see Tools).[5]
Since the script applies the syntax check on the actually typeset file (not on the currently opened file in the editor) this option is only useful if you are not typesetting in Product Mode.[6]
- Notifications and Sounds
- Switch Notifications and Sound on/off. (For notifications see below.)
- Dont’t Exclude generated PDF from Backup
-
By default the script writes an Extended Attribute to the output PDF file so that it will not get backed up by Time Machine.[7] This is meant to prevent unnecessary bloating of your backup, especially if you are producing large PDFs with every typesetting run. ConTeXt-generated PDFs are not “optimized” and can become ridiculously huge; a 150-page PDF can easily exceed 200MB.
This setting is activated by default because I’m assuming the following:
- Between the first draft of your document until the final one there will be many typesetting runs. The produced PDFs are effectively temporary files, not worth to be backed up.
- Once reached the final stage you certainly won’t distribute or archive the ConTeXt-generated PDF, but rather an optimized Save-as version (via Acrobat, Preview or other means). By doing this the non-backup attribute will get discarded automatically.
If this is not the case you should disable the backup exclusion (i.e. selecting the setting).
Note: ConTeXt itself writes the output PDF “in place”, that means if you have excluded the PDF once from backup the attribute will not go away by simply disabling the exclusion and typesetting again. After disabling the exclusion you have to trash the formerly genarated PDF in order to get a TM-included file again. Or, alternatively, execute
xattr -d com.apple.metadata:com_apple_backup_excludeItem <my-file.pdf>[8]Auxiliary files (.synctex.gz, .tuc, .log) receive always the backup-exclusion attribute. This is unaffected by this setting.
- Tools
- Opens the Tools submenu.
- Help
- Opens description (this file).
Modifier keys
Independently from the main settings, some of the options can be changed on the fly by holding down a modifier key at script launch:
- Option
- Swaps Normal typesetting mode and Product mode. (I.e. if you are in Normal mode you can go temporarly into Product mode by holding this modifier key and vice versa.) Temporarly means that at next script launch the mode will again be as set in the Options screen.
- Shift
- Toggles auto-launching of the PDF viewer temporarly on/off.
- Shift-Option
- Toggles temporarly between terminal and standard shell.
- Control-Option
- Register new product file. This is equivalent to the option in the Options screen.
- Control
- This is the most important key and rather a meta key, since it opens the Options screen which gives you access to all options (and tools) via GUI. Options set via the Options screen are remembered by the script until the option is either unset or the script is recompiled.
Note:
Usage of hotkeys and modifier keys is optional. The script is fully functional also when launched from the script menu. The Options screen can always be accessed by holding down the ctrl-key.
How to employ the modifier keys is explained below.
Tools
Some useful ConTeXt scripts and other things are available in the Tools submenu of the Options screen. The symbol semantics are the same as for the Options screen:
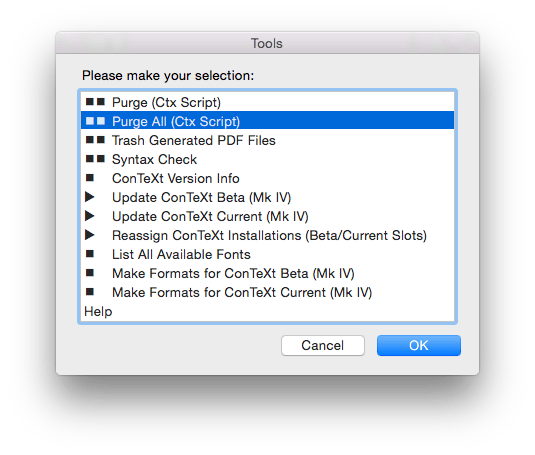
- Purge
- Runs
mtxrun texutil --purgefiles(log and synctex files are deleted). - Purge All
- Runs
mtxrun texutil --purgeallfiles(log , synctex and tuc files are deleted). - Trash Generated Pdf Files
- Shows you a list with all PDFs that are in the same folder as the current .tex file. Choose the PDFs to trash from the list. You can combine this command with either Purge or Purge all.
- Syntax Check
- Manually performs a syntax check on open or selected document. As with the automatic syntax check (see above) it uses mtx-check which can be useful for detecting for example missing braces.[5]
- ConTeXt Version Info
- Displays ConTeXt and LuaTeX versions.
- Update ConTeXt
-
Runs the install script
first-setup.sheither with--context=betaor--context=current. Only the Mark IV part is updated (--engine=luatex). At first run – or if you have renamed the designated folder – you will be presented with a folder selection dialog to choose the backup destination folder (i.e. archive folder).You will choose either your Beta or your Current installation for updating. Be careful if you have only one installation: it will be updated to the version you have selected (Current or Beta).[9]
This means also, if you have mapped for example an older ConTeXt Beta to the “Current” slot, it makes no sense to launch the update function on the “Current” slot. (By doing so you would “update” your Beta to the latest Current.)
In the settings section in the script you can change the archive format of the backup. Default is .tar.xz; archiving a complete ConTeXt Minimal folder takes about 20 seconds on my Mac Mini at a compression ratio of 28%. If this takes too long on your computer you may set it to .tar.gz (7s, 43%) or even to uncompressed .tar (3s). If you are like me and think that wasting food and disk space is a sin, of course xz is the only option ;-)
Please take into account that at the first run after an update ConTeXt will remake the formats which leads to considerably longer running time.
- Reassign ConTeXt Installations
-
Makes the script forget the currently assigned ConTeXt installation directories (slots for Current/Beta). If you select this you will then be prompted to select the new ConTeXt locations (setuptex files) for “Current” and “Beta” (the same what happens at the first run of the script). Of course, this is only useful if you have at least three different ConTeXt Standalones on disk.
Keep in mind that if you use the integrated updater the content of the “Current” slot will always be updated to the latest ConTeXt Current and the content of the “Beta” slot to the latest ConTeXt Beta. (See above “Update ConTeXt”.)
- List All Fonts
- Runs
mtxrun --script fonts --list --all. - Make Formats
- Runs
mtxrun --selfupdate ; mtxrun --generate ; context --make cont-en. Mark II (“pdftex ConTeXt”) formats are not remade. (I consider Mark II obsolete.) You have to choose either your Beta or your Current installation. If you have only one ConTeXt it doesn’t matter.
Note: Some of the tools will run in a Terminal window in the background. To see the progress/results bring the Terminal to the foreground.
Notifications
Notifications will be sent to Notifications Center and will show you some information:


- Used ConTeXt installation (Beta/Current)
- Start/completion of typesetting[10]
- File name
- Parent item: This is in Product Mode the containing folder of the product file, and in Normal Mode either the currently registered product file (if applicable) or the containing folder of the typeset file.
- Mode
Installation and setup
Basic installation
For basic installation place the script (or a symlink) into the Scripts menu
in the menu bar (Scripts folder at ~/Library/Scripts/). If you don’t have the
Script menu you have to enable it in Script Editor’s preferences.
The script is fully functional if launched from the Script menu. The Options screen can always be accessed by holding down the ctrl key. However, launching the script with the mouse from the menu bar can become tedious and doesn’t allow the simultaneous use of modifier keys (see below).
See also the note concerning Accessibility in the System requirements / other requirements section.
Like any other script the script can also be launched through your preferred launcher, like LaunchBar, Keyboard Maestro, Alfred, etc.
Launching the script with a hotkey
If you are working regularly with ConTeXt you will likely prefer to launch the script through a hotkey.
This can be done in several ways. Two examples:
Service workflow
Install a service workflow to the service menu (place it into
~/Library/Services/, or just double-click the workflow) and assign a hotkey to
the service in your Mac’s Keyboard preference pane. I’m using for example
cmd-F7. The workflow will act as script launcher and when you hit the hotkey
your document will be typeset.[11]
In the Extras folder you will find a preconfigured Service (Ctx Typeset – Standard.workflow). You just have to assign a hotkey.
Keyboard Maestro
Keyboard Maestro is an excellent application, specialized in assigning hotkeys. In the Extras folder you’ll find a macro example.
Using the modifier keys
Modifer keys are completely optional (except for the ctrl key which opens the Options screen). But if you work with different files and have to switch often, for example, between Product Mode and Normal Mode and/or between two product files, you will highly appreciate them.
Basically you have to possibilities to use the modifier keys:
- “Late” modifier keys: Press the modifier key(s) immediately after you have launched the script.
- “Simultaneous” modifier keys: Modifier keys are held down while you launch the script.
“Late” modifier keys
This is technically the easy way and also doesn’t require any further setup work. It works in combination with a hotkey launch (as described above) and even if the script is launched from the Scripts menu or with LaunchBar etc.
The script has a built-in delay of 0.6 seconds. This should be sufficient to quickly press the modifier key(s) after you have launched the script.
If you need more time, you can change the delay by editing the script, for example to 1 second. (Just search for “delay” in the script and you will see it.)
Or use the modifier keys simultaneously with the hotkey:
“Simultaneous” modifier keys
This is more comfortable and relaxed, but doesn’t work with all launch methods:
For example if you select the script from the Scripts menu while you hold down the option key, the script will be opened in Script Editor, instead of launched.
If the shift key is down, the script will not be launched either but revealed in the Finder. (As mentioned, the ctrl key works fine though; that means you can access the Options screen by holding down the ctrl key even when selecting the script from the Scripts menu.)
If you are launching the script via LaunchBar, Alfred etc. you will experience similar problems that make it impossible to use the modifier keys as simultaneous keys.
However there are at least two possibilities to apply the modifier keys in the “simultaneous” way:
Multiple Service workflows
Instead of installing just one Service workflow (as described above), you install several clones of the Service workflow, each one named differently.
Then you assign to each Service a modifier-hotkey combo, for example:
| Service workflow name | Assigned hotkey |
|---|---|
| Ctx Typeset - Standard | cmd-F7 |
| Ctx Typeset - Open Settings | ctrl-cmd-F7 |
| Ctx Typeset - Normal / Product Mode | opt-cmd-F7 |
| Ctx Typeset - PDF Launch On / Off | shift-cmd-F7 |
| Ctx Typeset - Terminal / Shell | opt-shift-cmd-F7 |
| Ctx Typeset - Register New Product File | ctrl-opt-cmd-F7 |
The script comes with preconfigured Service workflows (in the Extras folder). You can install them by double-clicking, then assign the hotkeys in System Preferences / Keyboard.
The six Service workflow clones do all the same: just launching the script. But the multiple instances allow you to assign hotkey combos that can be pressed simultaneously and which will affect the script’s behavior.
Note that you can freely choose the cmd-hotkey, the functions of the shift/ctrl/opt modifier keys however are hardcoded in the script.
Keyboard Maestro
Once again Keyboard Maestro. With this it is completely trivial to assign all the desired key combinations at once to just one launcher macro. No clones needed. See the screenshot in the Extras folder or import the macro I’ve prepared.
Note:
If you are exclusively using one of the simultaneous methods (multiple Service clones or Keyboard Maestro) you can reduce the delay in the script or even eliminate it. However, I’ve made the experience that without a minimum delay of maybe 0.2 seconds it happens that modifier keys are not reliably recognized. But this may depend on the system version, so just play around with the delay so that it works best for you.
If something doesn’t work as expected, please see the note concerning Accessibility in the System requirements / other requirements section.
First run
At first run the script wants to know the path to the setuptex file(s). This file is located in the tex folder inside your ConTeXt Minimal.
Normally you don’t have to do this by hand. The script tries to locate the setuptex files:
In a first attempt it makes a Spotlight search. If this works the result will be presented almost instantly.
If the Spotlight search doesn’t yield any results the script will do a traditional search with the ‘find’ tool in some preset folders and at a preset depth. This will take considerably more time than the Spotlight search. (If you see this happen, it normally means that your ConTeXt installations are not in a Spotlight-searchable directory or that your system is somehow borked (wrong file UTIs).)
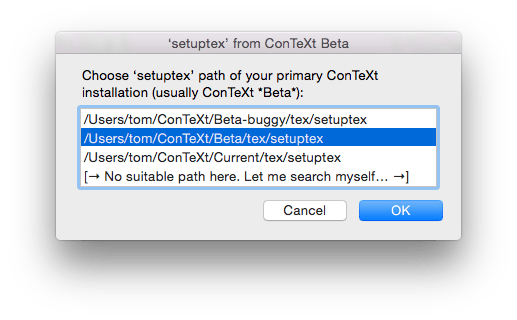
The script will then present you the found paths:
In the first results window select the path to your current ConTeXt Beta installation.
In the second results window select the path to your ConTeXt Current installation (or whichever ConTeXt installation you want to use in the “Current” role).
If you use only one ConTeXt installation you have to declare the same path for both.
If the script doesn’t find a valid path with either of the search methods it will show you the usual file selection dialogs. Even if it finds a path you can always overwrite it by forcing the file selection dialog (last line of the search results window).
The script will remember the paths unless you recompile (edit) the script.[12]
Immediately after the paths dialog the Main Options Window will pop up. Make your settings, click OK and launch the script again to start the actual typesetting run.
System requirements / other requirements
Of course, a ConTeXt Minimal (standalone) is required.[1]
The script is compatible with macOS 10.12 and 10.11, probably 10.10 and maybe 10.9, 10.8. On pre–10.9 systems notifications won’t work and you should disable notifications permanently in the settings section in the script.
awk must be installed for the version query.
If you compile the script as standalone application it should run properly, too. However execution may be slower. Not recommended.
For most tasks it is necessary to enable Accessibility rights in
System Preferences > Security & Privacy > Privacy > Accessibility, e.g.
for the Finder or for your text editor.
If you want to launch the script from the Scripts menu (in the menu bar) or from
FastScripts you have to give Accessibility rights to SystemUIServer.app! (It
will not show you a message window. After the first (failing) launch from the
Scripts menu open the Preferences Pane and set the checkmark.)
Thanks to the authors of these tools that are contained in the script bundle:
- p7zip (http://sourceforge.net/projects/p7zip/), originally by Igor Pavlov; used for multithreaded creation of xz archive for ConTeXt backup.
- Thanks also to Shane Stanley for his ASObjC Runner (http://www.macosxautomation.com/applescript/apps/runner.html), which was used in all previous versions of this script and has helped me tremendously building up the script. ASObjC Runner is not compatible with macOS Sierra, so the current version of the script no longer contains it.
-
In order to make the script work with a TexLive installation you have to disable the path check (comment the line “testPaths()”) and you must adapt the actual typesetting command to your needs, i.e. eliminating the sourcing of ‘setuptex’ and instead calling ‘mtxrun’ with the complete path or exporting your path variable. However I think there is no reason not to use a Minimal of the latest ConTeXt. ↩
-
If no valid document is found in the frontmost application the script actually will also test the second frontmost application for a valid file, befor falling back to the Finder selection. This is to prevent failures in cases where the text editor unintentionally has been pushed away from frontmost position. (This can happen especially if the script was launched as standalone application, or through other launch methods.) ↩
-
However the slot (Beta or Current) affects how an installation will be updated. See the description of the update functions in “Tools”. ↩
-
Other log viewers can be set in the settings section in the script. ↩
-
If you prefer the script concheck instead of mtx-check you can set this in the settings section in the script. ↩
-
If you need a syntax check on a component file you can always start the syntax check manually from the Tools screen. ↩
-
The backup exclusion works also for CrashPlan. ↩
-
In the Extras folder you will find an Automator workflow that can do this for you. ↩
-
This will only work if you don’t have fiddled around with your ConTeXt directories. The install script
first-setup.shmust be in its original location relatively to the ConTeXt root. ↩ -
A click on the completion banner opens the log file (10.8 only). ↩
-
Depending on the system version it is possible that you have to restart your text editor in order to make a newly installed service hotkey work. ↩
-
The script file has a settings section where you can also hard-set the paths (and change other defaults, and access some detailed settings that are not available in the Options screen). ↩